
Cuddon Freeze Dry Logo

How to Choose the Best Roof Drains for Your Project?

Choosing the best Roof Drains is not a minor specification decision. It affects ponding, membrane durability, structural safety, maintenance access, and long-term operating costs.

Professional guidance supports a site-specific approach. ASCE 7-22 requires roof drainage design to reflect local rainfall conditions, roof geometry, and drainage risks. NOAA Atlas 14 provides precipitation-frequency estimates that help engineers evaluate intense storm events. FM Global Property Loss Prevention Data Sheet 1-54 also highlights the importance of adequate roof drainage and emergency overflow protection. These references do not offer one universal drain size. They establish a disciplined design process.

Details matter. A flat commercial roof may need primary drains, secondary scuppers, strainers, sumps, and visible overflow routes. A narrow roof section can collect water around a parapet, even when the main outlet appears correctly positioned. Leaves, ice, debris, and uneven insulation can reduce actual flow. They are easy to underestimate. The U.S. Green Building Council and EPA stormwater guidance also encourage designs that manage runoff responsibly, especially in dense urban areas.

This guide examines drain capacity, outlet placement, material compatibility, climate exposure, maintenance requirements, and code coordination. It also considers installation realities, including clogged strainers and difficult access points. A product may look efficient on paper yet perform poorly after one neglected inspection cycle. That weakness deserves attention. Reliable selection combines calculations, experienced site review, manufacturer data, and local code verification. The best Roof Drains are not simply the largest or cheapest. They are the components that move water predictably, remain serviceable, and fit the complete roofing system.
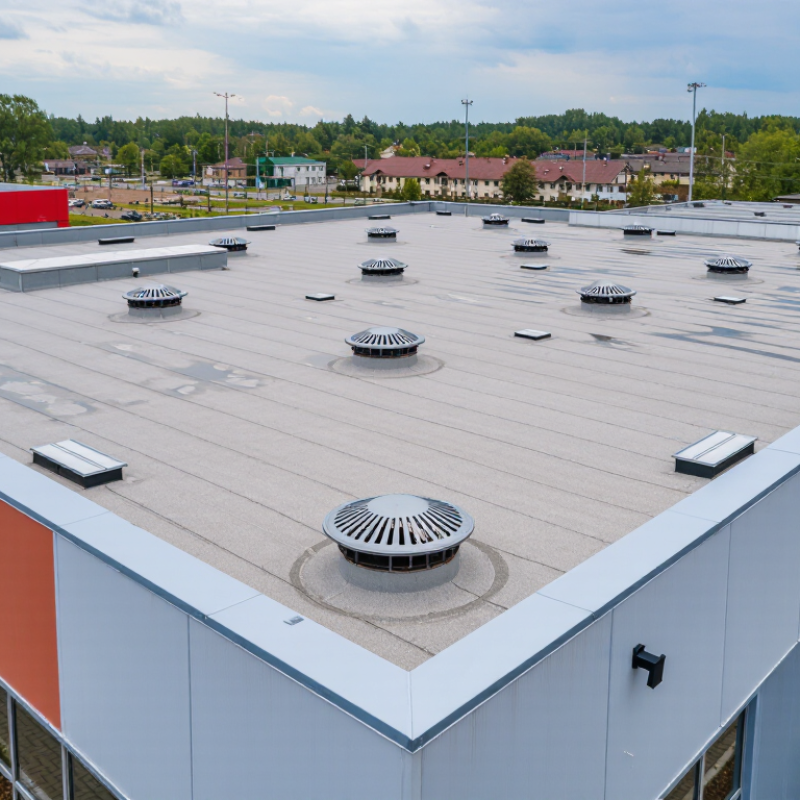
How to Choose the Best Roof Drains for Your Project?

Define Your Project’s Roof Drainage Requirements

Before selecting a roof drain, define the water it must manage. Record the roof’s plan area, slope, low points, drainage zones, and expected maintenance access. Measure parapet heights carefully. Small errors can create deep ponding.

Use local rainfall data, not a generic “heavy rain” allowance. NOAA Atlas 14 provides precipitation-frequency estimates by location and storm duration. ASCE/SEI 7-22 also addresses rain loads and ponding risks for roof design.

For example, a 100-square-meter roof facing 100 millimeters of rain per hour produces about 2.78 liters per second of runoff, assuming nearly complete runoff. Surface roughness and roof edges can change the result. So can blocked strainers.

Check each drain, leader, outlet, and overflow path as one system. The plumbing code, structural drawings, and local authority requirements must agree. A drain may appear adequate on paper but fail when leaves cover its dome. Keep access clear, provide visible overflow routes, and confirm whether secondary drainage is required. The NRCA Roofing Manual recommends coordinated drainage planning with the roofing and structural trades. That coordination is often missed.

A neat spreadsheet can still be wrong.

Field verification matters. Recheck elevations with a laser level, especially around insulation saddles. Document rainfall assumptions, drain spacing, pipe slopes, and maintenance conditions. If the roof has equipment, traffic, or future solar panels, recalculate the drainage zones before installation.

Compare Roof Drain Types and System Configurations

Choosing roof drains starts with comparing drainage types, not selecting a product by size. Conventional internal drains use gravity and suit many low-slope roofs. Siphonic systems use controlled air exclusion to move water through smaller pipes at high velocity. Scuppers discharge through parapet walls and offer visible overflow paths. They can be practical, but wind-driven rain may complicate discharge.

Rainfall data should guide the configuration. NOAA Atlas 14 provides precipitation-frequency estimates by location, while the International Plumbing Code uses local 100-year hourly rainfall rates for storm-drainage sizing. These figures affect outlet capacity, pipe diameter, and spacing. A roof with several low points usually needs multiple primary drains, not one oversized outlet. That mistake still appears in early drawings.

Overflow protection deserves equal attention. The Whole Building Design Guide recommends independent secondary drainage, such as overflow drains or scuppers, when blocked primary outlets could create dangerous ponding. Secondary outlets should remain visibly separate from primary discharge points. Otherwise, maintenance teams may miss a failure.

Configuration matters as much as drain type. Gravity layouts are easier to inspect and often tolerate minor slope differences. Siphonic layouts demand careful hydraulic design, accurate pipe gradients, and qualified installation. I would not specify siphonic drainage only to reduce pipe size. Access, debris control, freeze exposure, and future maintenance can outweigh that benefit. Test the assumptions against roof slope, parapet height, rainfall intensity, and actual inspection access. Forecasts are useful, but roofs are rarely perfect.

Match Drain Materials to Roof Design and Climate

How to Choose the Best Roof Drains for Your Project?

Roof drain material should follow the roof design and local climate, not just the purchase price. NOAA Atlas 14 provides site-specific precipitation-frequency data, including 24-hour rainfall estimates for major storm events. Use those figures when sizing outlets, leaders, and emergency overflows. A flat roof in a high-rainfall region needs greater drainage capacity and carefully sealed flashing.

For concrete decks and commercial roofs, cast iron offers strength, low noise, and strong fire performance. It can still corrode where standing water contains salts or industrial pollutants. Aluminum is lighter and useful for renovation work, but installers must control thermal movement and avoid galvanic contact with incompatible metals. Stainless steel suits coastal or chemically aggressive environments, although its higher cost needs project justification. Plastic drains resist corrosion, but ultraviolet exposure and temperature changes can weaken poorly protected components.

The 2024 International Plumbing Code, Table 1106.1, links roof drainage sizing to local rainfall rates. That requirement is easy to overlook. Field inspections often find blocked strainers, shallow sumps, or overflow routes ending beside foundations. The Whole Building Design Guide recommends coordinated roof drainage and envelope detailing, yet coordination frequently happens too late.

I would not treat material selection as finished after choosing the drain body. Check membrane compatibility, fasteners, expansion, access for cleaning, and the roof’s expected service life. One detail may still be wrong: a durable drain cannot compensate for an undersized system.

Assess Drainage Capacity, Installation, and Maintenance

Choosing a roof drain starts with rainfall, not pipe diameter. NOAA Atlas 14 provides precipitation-frequency estimates for durations from five minutes to 60 days. Use the local short-duration intensity, then check the roof’s catchment area and slope. One inch of rain across 1,000 square feet produces about 623 gallons of water. That volume can overwhelm a small outlet quickly.

Installation details often decide whether the design works. Position drains at low points, away from beams and service routes. Confirm the membrane, clamping ring, strainer, and pipe connection match the roof assembly. ASCE 7-22 rainfall data can support structural checks, but it does not replace local plumbing requirements. Include secondary drainage where regulations require it. A blocked primary outlet should not turn the roof into a shallow swimming pool.

Maintenance needs a physical plan. FM Global Property Loss Prevention Data Sheet 1-54 emphasizes keeping roof drainage paths clear and inspecting them regularly. Schedule checks before heavy-rain seasons, especially where leaves collect around parapets. Remove sediment by hand, inspect strainers for distortion, and photograph ponding after storms. It is easy to specify capacity and forget access. That mistake is common. Design teams should also question assumed rainfall data, because an old weather record may understate today’s exposure.

How to Choose the Best Roof Drains for Your Project?

Assess drainage capacity, installation requirements, maintenance access, and suitability for the roof design.

Drain Type Typical Outlet Size Indicative Flow Capacity* Recommended Roof Application Installation Requirements Maintenance Frequency Maintenance Access Advantages Limitations
Conventional Gravity Roof Drain 75–150 mm 2–12 L/s Most low-slope commercial, residential, and institutional roofs with adequate slope to drain points. Requires positive roof slope, properly sized horizontal leaders, a waterproof flashing connection, and a protective dome or grate. Inspect at least twice per year and after major storms; remove leaves, sediment, and debris as needed. Easy
Usually accessible from the roof surface.
Simple design, widely available components, low installation complexity, and straightforward inspection. Requires more pipe capacity and roof penetrations as drainage demand increases; standing water may occur if slopes are inadequate.
Siphonic Roof Drain 75–200 mm 8–35 L/s Large commercial, industrial, airport, warehouse, and multi-bay roofs where high flow rates and long drainage runs are required. Needs hydraulic engineering, anti-vortex baffles, precisely designed pipework, full-bore operation, and coordinated installation. Inspect at least twice per year; check baffles, outlets, pipe supports, and air-entry protection. Moderate
Access may be needed at outlets and inspection points.
High flow capacity, fewer roof penetrations, smaller horizontal pipe diameters, and efficient long-distance drainage. Higher design and installation complexity; performance depends on correct system sizing and airtight pipe connections.
Overflow Roof Drain 75–150 mm 2–12 L/s Secondary drainage for buildings where blocked primary outlets could create unsafe water depth or structural loading. Must be set above the primary drain level and coordinated with parapet height, waterproofing, and visible discharge points. Inspect at least twice per year and confirm that the opening and discharge path remain unobstructed. Easy
Exterior outlets are generally simple to observe.
Provides an independent warning and relief path during primary drain blockage or extreme rainfall. It is a backup system, not a substitute for correctly sized primary drainage; discharge may affect façades or walkways.
Roof Scupper 100–300 mm opening width 3–25 L/s Roofs with parapets, perimeter gutters, or visible exterior drainage routes. Requires accurately formed wall openings, durable flashing, adequate overflow protection, and a clear external discharge route. Inspect twice per year and after severe weather; remove debris from the opening and downstream gutter or leader. Easy
Typically visible from the roof edge or building exterior.
Simple visual inspection, no vertical roof penetration, and convenient emergency overflow visibility. Can stain exterior walls, discharge water near pedestrians, and perform poorly if the opening is too small or obstructed.
Channel or Linear Roof Drain 100–300 mm channel width 2–20 L/s per outlet Terraces, balconies, podium roofs, planted roofs, roof edges, and areas receiving concentrated surface runoff. Requires continuous falls toward outlets, accurate channel setting, removable grates, waterproofing integration, and accessible cleanouts. Inspect quarterly in areas with trees or heavy debris; otherwise inspect at least twice per year. Moderate
Grates should be removable without damaging adjacent finishes.
Collects sheet flow across wide areas and can provide a neat, low-profile drainage detail. Long channels can clog or pond if improperly sloped; grates require regular cleaning in high-debris locations.
Green Roof Drain with Inspection Box 75–150 mm 2–12 L/s Extensive and intensive green roofs where drainage layers, root barriers, and growing media surround the outlet. Requires a drainage layer, filter fabric, root-resistant detailing, visible inspection boxes, and a clear gravel or maintenance zone around the drain. Inspect quarterly during the growing season and after severe storms; control roots, plants, and sediment near the drain. Moderate
Inspection boxes must remain visible and accessible.
Protects the waterproofing system while supporting controlled drainage beneath planted roof assemblies. Vegetation and sediment can obstruct flow; maintenance access must be planned before planting and paving are installed.

*Indicative flow capacities are typical planning ranges only. Actual capacity depends on outlet diameter, hydraulic head, rainfall intensity, roof area, pipe configuration, grate or dome resistance, local plumbing requirements, and the manufacturer’s tested performance. Final sizing should be verified by a qualified drainage engineer using the applicable local design rainfall data.

Verify Standards, Costs, and Long-Term Performance

When choosing roof drains, I start with the project’s rainfall data, roof area, and outlet capacity. Appearance comes later. Verify the applicable local building codes and recognized drainage standards before comparing products. Request flow-rate tests, material specifications, load ratings, and corrosion-resistance evidence. A drain may look robust, yet perform poorly during intense rain. Check whether its tested capacity matches your roof design, not just the advertised maximum.

Cost should include more than the purchase price. Ask for installation labor, membrane connection details, access requirements, inspection time, and replacement parts. A low-cost drain can require extra adapters or difficult cutting around insulation. I once saw a budget choice delay waterproofing work because the outlet dimensions were poorly confirmed. That mistake cost more than the original saving. Obtain written quotations with identical technical requirements. Otherwise, price comparisons become misleading.

Long-term performance depends on maintenance access and site conditions. Look for removable grates, secure seals, durable fasteners, and materials suited to local exposure. Coastal air, freeze-thaw cycles, falling debris, and heavy foot traffic each create different risks. Confirm cleaning intervals and warranty conditions in writing. A long warranty means little if installation requirements are unclear. I also prefer independent test documents over unsupported claims. Still, documents are not everything. Review the roof layout with a qualified drainage professional, because an excellent drain cannot correct poor slope or undersized pipework. Small details matter.